Delights of a Minnesotan Gigabit Switch (part 3, good hax!)
Welcome back! I’m rehabilitating and taking control of a Waters Network Systems GSM-2112-POE 12-port managed Ethernet switch. You can check out part 1 or part 2 if you feel like it.
In case you don’t feel like it, I’ll sum up where we are in the story: my current Ethernet switch has no character and isn’t rack-mounted so much as rack-zip-tied:
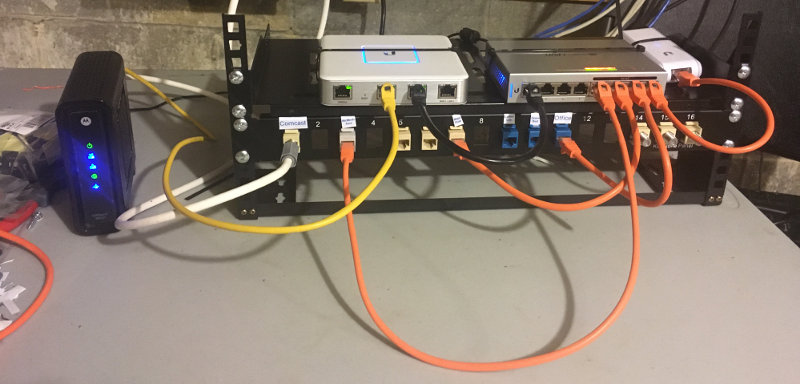
I expect to need more than its four power-over-ethernet ports. I’ve bought a high-quality but decade-old switch from eBay for pretty cheap. The people who sold me the switch did not do a factory reset, and I don’t have the admin password. My attempts to hack the thing over the network have failed up to this point. They could possibly be successful eventually, but they seem like an annoying amount of work. I have bought the cable to go from my USB port to this Serial console on the back of the box:

Okay, I hook the new cable up between the Serial port and my laptop. How do I actually talk to it?
In my youth, my daddy taught me to use a program called Kermit to dial into some computer at his work so that I could read rec.pets. Fond memories, and Kermit is furthermore a great name for a program, but alas: I now find it 100% incomprehensible. GNU Screen seems to be the actual thing to use.1
The baud2 rate 57600 comes from the manual. Here’s the command line to connect and start interacting:
sudo screen /dev/ttyUSB0 57600
And rebooting the switch gives:
Read system parameters from IIC EEPROM...Done!

BIOS v1.07

BIOS(0)> ................................................
.........................................................
............Now booting image...
Followed by the normal login prompt - the login isn’t any different from what I see on telnet. But hey, the BIOS(0)>. The > looks like a command prompt? Yes actually! Apparently you have to be quite speedy, there’s only a few seconds grace period, but after a few tries:
BIOS(0)> help
 ===========================================================
        BIOS Command line interface HELP
 ===========================================================
 help       :  Help for bios command.
 ls         :  Display the bios command list.
 sysconf    :  System parameter configuration.
 flash      :  Flash Device Utility.
 load(r)    :  Excutable image download[load] & run[loadr] at free memory area.
 boot       :  vLinux Boot Loader can be selected.
 dump       :  Memory Dump Command.
 sys        :  Usage : sys {model|mac{0|1}|prod|ser|hard|mech|ram|flash|show} value .
 look       :  look ext 0 , 1 ,2 .
 fill       :  fill memory (4 byte) .
 sdram      :  SDRAM test .
 p1         :  p1 {0|1} GBIO Port 1.
 rd         :  rd block sublock reg
 ===========================================================

BIOS(1)>
Huh, sysconf looks vaguely interesting, let’s look:
BIOS(1)> sysconf view

Read system parameters from IIC EEPROM...Done!

+==================================================+
|           System Configuration Table             |
+==================================================+
|  Configuration Parameter valid !!!               |
|               Boot Configuration                 |
+--------------------------------------------------+
|  BOOT Method : manual                            |
|  Boot File Name :                                |
|  TFTP Server IP Address : 192.168.1.176          |
+--------------------------------------------------+
|             Ethernet Configuration               |
+--------------------------------------------------+
|  Host Name : RubyTech                            |
|  Ethernet IP Address : 192.168.1.1               |
|  Ethernet Default Gateway : 192.168.1.254        |
|  Ethernet Default Subnet Mask : 255.255.255.0    |
|  Ethernet H/W Address : 00:40:c7:d0:00:00        |
+==================================================+
Cool! You love to see the text-based tables, for one thing. But more pertinently, it looks like if I created a bootable firmware image, the BIOS would let me load it onto the switch using TFTP and boot into it! So how do I do that?! Actually, it’s not super easy.3 So I put this possibility in my back pocket for now. Another interesting thing we can see here is the name RubyTech. I asked Jeeves, and RubyTech is apparently a Taiwanese supplier of private label network equipment. Presumably it’s where Waters bought the hardware?
I poked around the menu a while longer, which I’ll spare you. The most useful thing turned out to be the memory dump command:
BIOS(4)> dump 0x0
00000000:0000000f   18 f0 9f e5 18 f0 9f e5  -  18 f0 9f e5 18 f0 9f e5
00000010:0000001f   18 f0 9f e5 18 f0 9f e5  -  18 f0 9f e5 18 f0 9f e5
00000020:0000002f   01 18 a0 e3 01 24 a0 e3  -  04 30 90 e4 04 30 82 e4
00000030:0000003f   04 10 51 e2 fb ff ff 1a  -  58 23 5e 00 ff 10 a0 e3
00000040:0000004f   00 10 80 e5 14 01 9f e5  -  20 10 a0 e3 00 10 80 e5
00000050:0000005f   f8 00 9f e5 f8 10 9f e5  -  00 10 80 e5 5c 00 8f e2
00000060:0000006f   fe 1f 90 e8 ec 00 9f e5  -  fe 1f 80 e8 f0 00 9f e5
00000070:0000007f   01 18 a0 e3 5e 28 a0 e3  -  04 30 90 e4 04 30 82 e4
00000080:0000008f   04 10 51 e2 fb ff ff 1a  -  5e f8 a0 e3 00 00 00 00
00000090:0000009f   f8 3f 50 05 60 00 00 04  -  50 00 08 24 4c 00 09 25
000000a0:000000af   00 00 00 00 00 00 00 00  -  00 00 00 00 80 03 04 20
000000b0:000000bf   00 00 00 00 00 00 00 00  -  00 00 00 00 60 83 21 9c
000000c0:000000cf   f8 3f 50 05 60 00 04 14  -  50 00 08 24 4c 00 09 25
000000d0:000000df   00 00 00 00 00 00 00 00  -  00 00 00 00 80 03 00 10
000000e0:000000ef   00 00 00 00 00 00 00 00  -  00 00 00 00 60 83 21 9c
000000f0:000000ff   f8 3f 50 05 60 00 00 04  -  50 00 08 24 4c 00 09 25

===========================================
=   1. Next Memory Address View![Any Key] =
=   2. New Address Input![N]              =
=   3. Exit [Q]                           =
===========================================
Well, cool - we can see the memory in hexadecimal format. That page doesn’t actually mean anything to me yet, but there’s got to be good stuff in there if we look through everything! At last, a clear direction - time to start hackin’, baby! That’s what real hackers say, right?
Here’s a script using pexpect to start the serial communication and interact with the BIOS menu to record everything to a file, memory_dump.txt.
Assuming you’ve got a Python 3 virtualenv env with pexpect installed, and the script is dump_memory.py, you’d invoke it as sudo env/bin/python dump_memory.py. Once the script is started, you would Reset the switch.
import pexpect
import time


# Start communicating with the switch
child = pexpect.spawn('screen /dev/ttyUSB0 57600')
# Tell pexpect to record one side of the conversation -
# everything the switch sends to the laptop - to a file
child.logfile_read = open('memory_dump.txt', 'wb')

# This means to ignore everything the switch sends to us,
# UNTIL we get the '> ' - the BIOS command prompt.
child.expect('> ')
time.sleep(0.1)
# Start the memory dump at address 0
child.send('dump 0\r\n')

# Keep sending Space every time it's done printing
# a block of memory
while True:
    child.expect('Next Memory Address View')
    time.sleep(0.1)
    child.send(' ')
I run it for a while - maybe an hourish? At some point, I notice that it only seems to be reading f8 3f 50 05 over and over and over again. This pattern seems to start at the 20 megabyte boundary (0140 0000 hex). There are a few other bytes thrown in, but this seems boring, so I stop the process.
I don’t want to deal with this as hex, I want to make it a binary file so that I can unzip it if it’s zipped, search for strings, and so on. So I write another small python3 script, to separate the lines with hex data from the lines with BIOS(0), the instructions, and so on, and then convert the hex to the binary characters it represents:
out = open('memory_dump.bin', 'wb')

# Example lines this will deal with:
"""
000000e0:000000ef   00 00 00 00 00 00 00 00  -  00 00 00 00 60 83 21 9c
000000f0:000000ff   f8 3f 50 05 60 00 00 04  -  50 00 08 24 4c 00 09 25

===========================================
=   1. Next Memory Address View![Any Key] =
=   2. New Address Input![N]              =
=   3. Exit [Q]                           =
===========================================
00000100:0000010f   00 00 00 00 00 00 00 00  -  00 00 00 00 13 02 04 a0
00000110:0000011f   00 00 00 00 00 00 00 00  -  00 00 00 00 60 83 21 9c
"""
for line in open('memory_dump.txt', 'r'):
    # Exclude lines with only instructions & stuff.
    # There's also all kinds of control codes and junk
    # in there, but I ignored it and it didn't
    # seem to matter?
    if line and line[0] in '01234567890abcdef':
        line = line.strip()
        # The sections of the line are separated by double spaces.
        # We don't care about the address or the dash, just the
        # first and second sections of data.
        addr, first, dash, second = line.split('  ')
        out.write(bytes.fromhex(first))
        out.write(bytes.fromhex(second))

out.flush()
out.close()
So I’ve got a 20+ megabyte binary file - what is in there? I have seen people do pretty wild stuff to firmware images with a program called binwalk, so I install that and set it loose. Unfortunately, it misidentifies basically everything. Nope, that’s not a stuffit file, and that other thing isn’t 7zip. I don’t know. It doesn’t do it for me.
Presumably there must be a kernel in there, and possibly file data, but I don’t get as far as figuring that out, because strings turns out to be the only analysis tool I need. strings is a basic Unix tool that looks inside a binary file for parts that look like text. I spend a bit of time paging through the results, but eventually I get bored, and search for admin, the administrator username from the documentation. Boom!
admin
adminpass
guest
guest
0.0.0.0
0.0.0.0
public
private
There it is! Very likely the password!4
I had been expecting a normal Linux /etc/passwd or shadow file entry like admin:$1$YjOzcqrf$Zqx4sx5CQRuEIFCdOLAJV0:0:0:admin:... but no, it seems to be sitting there in plain text, no password cracking required! Sure enough:
L2 Managed Switch - GEPoEL2-SW12

Login: admin
Password:

waters2#
If you’re doing this on your system and the memory layout is identical, then you should just have to dump one block, starting at 0x011b0400. This switch has the concept of two independent configurations, one that’s used when rebooting and another that can be made active by a command. So that you can really screw up the temporary config, and when everything goes to hell, reboot the switch and everything should be peachy again. Anyway, I did see another copy of the user/pass data at 0x013b0400, two megabytes after the first copy, so maybe that’s how this double config thing works.
Anyhow! Yay! The switch is mine now! My naming scheme for computers is names of fictional musicians (e.g. Jake and Elwood Blues), plus fanciful stage names of real musicians (e.g. Tank Slagknuckle and Stellar Tellar).5 So, I’m pleased to introduce Mr. Fabulous:
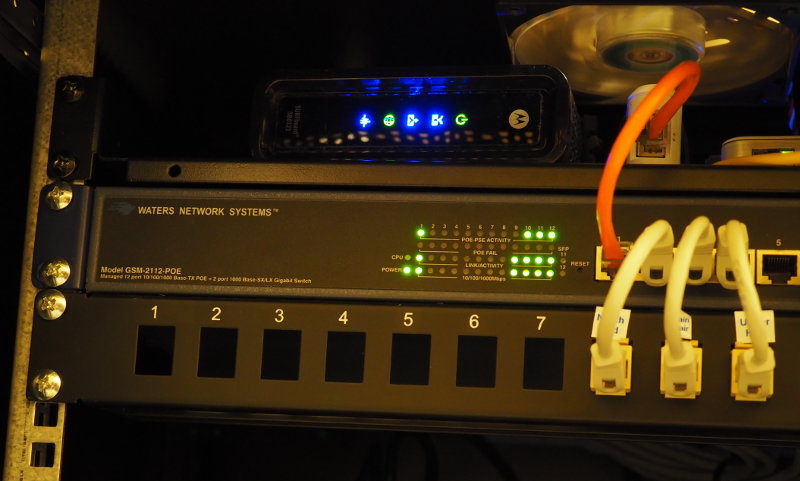

Mr. Fabulous been doing strong work for a month or two now, and I’m very pleased. I set up a VLAN for some of my Internet of Shit devices, and the switch’s port mirroring capability made that very easy to debug. The switch’s extremely beefy-looking internal power supply has had zero trouble taking care of the four powered devices on my network - I’ve never noticed the switch get perceptibly warmer than ambient temperature.

Given the one to two decade old network security of the switch’s web interface, I’ve placed that off in an inaccessible subnet, and I do all my admin through the serial console. Just because I’m too lazy and simpleminded to hack this thing over the network, that doesn’t mean everyone is.
Thanks for reading!
-
Why is Screen a serial communication console as well as a window manager and a bad process supervisor? IDK, I slightly resent Screen. Give me Tilix any day! Except the day I need to talk to a crusty ol’ serial console. Humph. ↩
-
Re: data transmission, check these videos out if you want to be fascinated, or this paper if you want to be both fascinated and bored! ↩
-
According to an article from hackaday,
There is no uniform way that ARM processors are booted and there’s no uniform or even standardized boot software for ARM-based chips.
-
It’s not the real one, since I told you too much about the institution the box came from. The real password had an air of sadness though. ↩
-
I made an exception for this switch’s predecessor. I thought that since it was a Power over Ethernet (PoE) switch, it should be called Edgar Allan. But I bet everyone with a PoE switch thinks the same thing :-/ ↩